Last Thursday, I was staring into the fridge at 6:45 PM, feeling that specific brand of panic that only happens when you’re hungry but also exhausted. My kids had just finished soccer practice, my husband was logging on to a late Zoom call, and I had exactly zero energy to cook a “real” dinner. I didn’t want takeout. I didn’t want salad. I wanted something warm, salty, and deeply satisfying without spending an hour standing over a stove.
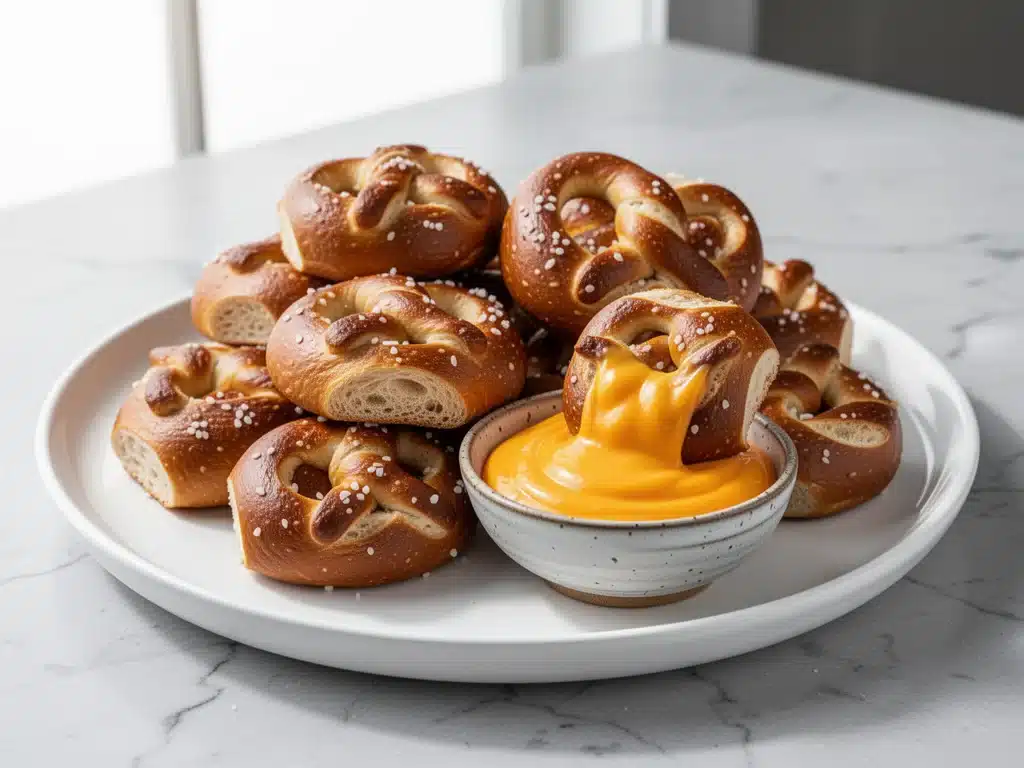
So, I threw together these soft pretzel bites. I know, I know—pretzel dough usually sounds like a weekend project. But here’s the secret: when you skip the shaping and just boil tiny nuggets of dough, you get all the chewy, salty goodness in a fraction of the time. I served them with a quick creamy cheddar dip, and the reaction was instant. My husband paused his call long enough to ask for seconds. My kids declared them “better than restaurant snacks.” Even my dog gave them a hopeful sniff (don’t feed them to dogs, by the way, the salt and onion powder are a no-go).
That night, these soft pretzel bites became my new emergency button. They’re warm, they’re comforting, and they come together in about 15 minutes from start to finish. If you’ve ever felt that post-work slump where cooking feels like a chore, this recipe is your lifeline. It’s not just a snack; it’s a mood lifter. And the best part? You probably have most of the ingredients already.
Why You’ll Love This Recipe
I’ve been making these soft pretzel bites for busy weeknights for about six months now, and they’ve earned a permanent spot in my rotation. Here’s why they’re worth the 15 minutes:
- Stupid Simple — Seriously, if you can boil water and stir cheese, you can make this. I’ve walked my teenage daughter through it over FaceTime while she was at college, and she nailed it on the first try. There’s no kneading, no rising time, and no fancy techniques.
- Lightning Fast — 15 minutes from start to finish. That’s faster than ordering delivery, waiting for the driver, and dealing with the tip. I make these on nights when I get home at 7pm and my brain is completely fried.
- Pantry-Friendly — You likely have yeast, flour, and cheese already. The only special item might be baking soda for the boiling step, but you probably have that in your cleaning cabinet. I keep the key items stocked just so I can make this on a whim.
- Crowd-Pleaser — I’ve served these to my vegetarian sister, my gluten-free neighbor (using GF flour blend), and my dad who thinks snacks are “just bread.” Everyone loved it. The dip is the real MVP here.
- Makes Amazing Leftovers — Okay, they’re gone in five minutes, but if you manage to save any, they reheat beautifully in the toaster oven. Crispy outside, soft inside. Better than cold pizza.
- Budget-Smart — Feeds 4-6 people for under $8. That’s less than one appetizer at a bar. It’s cheap, it’s filling, and it feels fancy.
This is my go-to when I need dinner to just work. No complicated techniques, no weird ingredients, just reliable, delicious food that makes everyone happy.
Ingredients You’ll Need
Here’s the best part: you probably have most of this already. I’m particular about three ingredients here, and I’ll tell you exactly why.
For the Dough
Warm water (1 cup / 240ml) — This is the lifeblood of your yeast. It needs to be warm to the touch, like a baby’s bath. Not hot, or you’ll kill the yeast. Not cold, or it won’t activate. I test it with my pinky finger—warm but not burning.
Active dry yeast (1 packet / 2.25 tsp) — I always use Red Star or Fleischmann’s. They’re reliable. Instant yeast works too, but active dry gives that classic yeast flavor I love. Check the expiration date! Dead yeast means no rise.
Granulated sugar (1 tablespoon) — Just a pinch to feed the yeast. You don’t want sweet dough, just enough energy for the yeast to wake up. If you’re cutting back on sugar, honey works too.
All-purpose flour (2.5 cups / 300g) — I use King Arthur or Gold Medal. Bread flour makes them chewier, but AP flour gives that perfect soft-pretzel texture. Don’t use cake flour; it’s too delicate.
Salt (1 teaspoon) — Essential for flavor. Pretzels without salt are just sad bread. I use kosher salt for mixing, but fine sea salt for the topping.
Melted butter (2 tablespoons) — Adds richness and tenderness. I use unsalted so I can control the salt level. Olive oil works, but butter tastes better here.
For the Boiling & Topping

Baking soda (¼ cup / 30g) — This is the magic step. Boiling the dough in baking soda water gives pretzels their distinctive brown crust and chewy texture. It’s not optional if you want authentic pretzel bites.
Coarse sea salt (for sprinkling) — Pretzel salt is ideal, but kosher salt or even flaky sea salt works. The big crystals stick better and give that satisfying crunch.
For the Creamy Cheddar Dip
Cheddar cheese (1 cup / 100g, freshly grated) — Buy the block and grate it yourself. Pre-grated cheese has anti-caking agents that make the dip grainy. Sharp cheddar gives the best flavor; mild cheddar is too bland.
Heavy cream (½ cup / 120ml) — Full-fat only. Half-and-half makes it too thin. Trust me on this. The fat carries the cheese flavor.
Garlic powder (½ teaspoon) — Adds depth without the bite of fresh garlic. It blends seamlessly into the cream.
Worcestershire sauce (1 teaspoon) — The secret ingredient. Adds umami and savory depth. You won’t taste the sauce itself, just a richer cheese flavor. If you’re out, a dash of soy sauce works.
Hot sauce (optional, to taste) — I add a few dashes for a little kick. Frank’s RedHot or Cholula work great.
Equipment Needed
You don’t need fancy equipment for this. Here’s what I actually use.
Large pot — I use a 6-quart Dutch oven. It needs to fit the water and allow the bites to move around freely. My ancient pot from college still works fine.
Slotted spoon or spider strainer — Essential for lifting the boiled bites out of the water. A regular spoon works, but a slotted one drains better. I learned this the hard way with a soggy pretzel.
Baking sheet — Standard 13×18 inch sheet. Line it with parchment paper for easy cleanup. Silicone mats work too, but parchment is cheaper.
Small saucepan — For melting the butter and making the dip. 1-quart size is perfect.
Microwave-safe bowl — For melting the cheese and cream together. Or you can do it on the stove over low heat.
Whisk — For the dip. Keeps it smooth and lump-free.
Pastry brush — Optional, but nice for brushing melted butter on the bites before salting. I use a cheap silicone brush from the dollar store.
How to Make It: Step-by-Step
Alright, let’s make this! I’m walking you through exactly how I do it, including the little tricks I’ve picked up.
Step 1: Activate the Yeast (5 minutes)
In a small bowl, combine the warm water, sugar, and yeast. Stir gently and let it sit for 5-10 minutes. You’re looking for a foamy, bubbly layer on top. If it doesn’t foam, your yeast is dead or the water was too hot/cold. Start over. Don’t skip this step—it’s the foundation of the whole recipe.
Step 2: Make the Dough (5 minutes)
In a large mixing bowl (or stand mixer with dough hook), combine the flour and salt. Pour in the foamy yeast mixture and the melted butter. Stir until a shaggy dough forms. If using a mixer, knead on low for 3-5 minutes until smooth and elastic. If doing it by hand, turn it out onto a floured surface and knead for 5 minutes. The dough should be soft but not sticky. Add a sprinkle of flour if it’s too wet, or a splash of water if it’s too dry.
Step 3: Shape the Bites (2 minutes)
Divide the dough into 12-15 equal pieces. Roll each piece into a smooth ball. Don’t worry about perfection—just make sure they’re roughly the same size so they cook evenly. I usually just pinch them off and roll them between my palms. It’s meditative and quick.
Step 4: Boil the Bites (5 minutes)
Bring a large pot of water to a boil. Carefully stir in the baking soda—it will foam up vigorously, so don’t overfill the pot. Drop the dough balls into the boiling water, a few at a time. Boil for 30 seconds per side. They’ll float to the top when they’re ready. Use a slotted spoon to remove them and place them on the prepared baking sheet. This step gives them their chew and color.
Step 5: Bake (10 minutes)
Preheat your oven to 425°F (220°C). Brush the boiled bites with melted butter (optional but recommended). Sprinkle generously with coarse sea salt. Bake for 10-12 minutes until golden brown. They should sound hollow when tapped on the bottom. Let them cool for 2 minutes before eating—they’re very hot inside!
Step 6: Make the Dip (While baking)
In a small saucepan or microwave-safe bowl, combine the heavy cream, grated cheddar, garlic powder, Worcestershire sauce, and hot sauce. Heat gently, stirring frequently, until the cheese is melted and the sauce is smooth. Do not boil the cheese sauce, or it might separate. Keep it warm while you bake the bites.
Expert Tips & Tricks
Here’s everything I’ve learned from making this dozens of times. These tips will save you from my mistakes.
Don’t Skimp on the Baking Soda
This is the #1 tip. The baking soda bath is what transforms plain boiled dough into a pretzel. It creates the alkaline environment needed for the Maillard reaction, giving you that dark brown crust and unique flavor. Skip it, and you just have boiled bread balls.
Watch the Boil Time
30 seconds per side is perfect. If you boil them too long, they become dense and gummy. Too short, and they don’t get the right texture. Set a timer. I’ve ruined batches by guessing.
Grate Your Own Cheese
Pre-grated cheese contains cellulose, which prevents it from melting smoothly. Your dip will be grainy and weird. Grate a block of cheddar—it takes 2 minutes and makes a huge difference. My husband can tell when I’ve been lazy and used pre-grated.
Keep the Dip Warm
Cheese sauce solidifies as it cools. Keep it in a small slow cooker on low, or in a microwave-safe bowl in the microwave for 10 seconds before serving. Nobody likes cold, congealed cheese dip.
Room Temperature Cream
Cold cream can make the sauce separate. I take mine out of the fridge 15 minutes before cooking. If I forget, I microwave it for 15 seconds.
Common Mistakes (and how to avoid them):
- Mistake: Dough is too sticky — Fix: Add flour 1 tablespoon at a time. Don’t dump it all in at once.
- Mistake: Bites are flat — Fix: Make sure the water is at a rolling boil, not just simmering.
- Mistake: Dip is too thick — Fix: Add a splash of milk or cream to thin it out.
Pro Tricks I’ve Learned:
- For Extra Flavor — Add everything bagel seasoning to the topping for a fun twist.
- For Better Texture — Let the baked bites cool on a wire rack, not the pan. This prevents the bottoms from getting soggy.
- Make-Ahead Strategy — You can freeze the unbaked boiled bites on a baking sheet. Once frozen, transfer to a bag. Bake straight from frozen, adding 2-3 minutes to the bake time.
Variations & Substitutions
Once you’ve nailed the basic version, here’s how you can mix it up. I’ve tried all of these.
Garlic Herb Butter
Mix minced fresh garlic and dried parsley into the melted butter before brushing. Adds a savory kick.
Everything Bagel Bites
Skip the sea salt and sprinkle with everything bagel seasoning. Great with cream cheese dip.
Spicy Jalapeño Bites
Add diced jalapeños to the dough before boiling. Serve with a spicy queso dip.
Lighter Version
Use low-fat milk instead of heavy cream for the dip. It’s thinner but still good. I make this when I’m trying to be “healthy.”
Vegan Option
Use water instead of butter in the dough. Use vegan cheddar and coconut cream for the dip. It’s different but still tasty. My vegan friend requests this version.
Dietary Modifications:
- Gluten-Free — Use a 1:1 gluten-free flour blend. The texture will be slightly different but still delicious. I’ve used Bob’s Red Mill and it works great.
- Dairy-Free — Replace butter with olive oil and cheddar/coconut cream with dairy-free alternatives.
Serving & Storage
How to Serve:
I usually serve these straight from the baking sheet at the dinner table—it looks rustic and stays warm. But here are other ways I’ve enjoyed them:
Side Dishes:
- Beer cheese dip (classic pairing)
- Whole grain mustard
- Apple slices (for a sweet/salty combo)
- BBQ pulled pork sandwiches (use the bites as buns)
Wine Pairing:
Not a wine expert, but my wine-snob friend says a crisp Pilsner or a light Lager works great with this. For wine, a Sauvignon Blanc cuts through the richness.
Storage Instructions:
Refrigerator:
Store in an airtight container for up to 3 days. The bites will firm up, but they reheat well.
Reheating:
Best method: Oven or toaster oven at 350°F for 5 minutes. This restores the crispness.
Microwave method: 30 seconds. They’ll be soft and chewy, not crispy.
Never works: Leaving them out at room temperature for hours. They’ll go stale fast.
Freezing:
Freeze baked bites for up to 2 months. Reheat in the oven for best results. You can also freeze the unbaked boiled bites (see tips above).
Meal Prep:
Boil and bake a double batch on Sunday. Store in the fridge. Reheat individual portions during the week. Takes 5 minutes and tastes way better than store-bought.
Nutrition Information
I’m not a nutritionist, but here’s the breakdown if you’re tracking. Note that these are estimates and will vary based on exact measurements.
Per Serving (based on 6 servings, including dip):
| Nutrient | Amount |
|---|---|
| Calories | 320 |
| Protein | 12g |
| Carbs | 35g |
| Fiber | 2g |
| Sugar | 3g |
| Fat | 15g |
| Sodium | 650mg |
What’s Good:
- Decent protein from the cheese and flour
- Calcium from the cheddar
- Quick and satisfying
What to Know:
- Higher in sodium due to the baking soda and salt
- Contains gluten and dairy
- Calorie-dense due to the cheese sauce
My Take:
Look, these are soft pretzel bites with cheese sauce. They’re not a diet food. But they’re way better than processed snacks, cost less, and I know exactly what’s in them. When I want to make it lighter, I use less cheese in the dip and add more vegetables on the side. But usually? I just enjoy a reasonable portion and be happy.
Final Thoughts
So that’s my go-to soft pretzel bites! I’ve probably talked your ear off at this point, but when you make a recipe this often, you have a lot to say about it.
This has saved weeknight snacks more times than I can count. It’s my answer to “what’s for dinner” when I’m tired, don’t want takeout, and still want something that tastes really good. My kids are happy, my husband’s happy, and I’m happy because I’m not stressed about cooking.
Make it yours! Try different toppings, swap in your favorite cheese, adjust the spice level. The best recipes are the ones you adapt to your family’s tastes.
If you make this, drop a comment and let me know what you think! I love hearing how recipes turn out in your kitchen. And if something doesn’t work, tell me that too—I’m here to help troubleshoot.
Happy cooking! And I hope your kitchen smells half as good as mine does right now.
Frequently Asked Questions
Can I use instant yeast instead of active dry?
Yes, you can! Instant yeast doesn’t need to be activated in water first. Just mix it directly with the flour. The rise time might be slightly faster, so keep an eye on the dough. The flavor is very similar, though some people say active dry has a slightly more pronounced yeast taste.
Why did my pretzel bites turn out flat?
This usually happens if the water isn’t hot enough when you boil them, or if the dough is too wet. Make sure the water is at a rolling boil, and ensure your dough is firm enough to hold its shape. Also, don’t let them sit on the counter too long before boiling—the yeast continues to work, and they can spread out.
Can I make the dough ahead of time?
You can, but it’s tricky. Yeast dough continues to rise. If you make it ahead, you need to punch it down and keep it in the fridge, but it might over-proof. It’s best to make the dough and boil/bake it in the same session for the best texture. If you must prep ahead, shape the balls and freeze them immediately after boiling, then bake from frozen.
Why did my cheese dip get grainy?
Grainy cheese sauce is usually caused by high heat or pre-grated cheese. Cheese proteins tighten up and separate if heated too quickly. Always use low heat and stir constantly. Also, grate your own cheese from a block—pre-grated has additives that prevent smooth melting.
Can I freeze the unbaked dough?
It’s not recommended. Yeast dough doesn’t freeze well raw; it can become dense and lose its rise when thawed. It’s better to bake the bites first, then freeze them. Or, boil them and freeze them unbaked (as mentioned in the tips), which works surprisingly well.
What if I don’t have baking soda?
You can try using lye (food-grade sodium hydroxide), which is traditional for pretzels, but it’s dangerous to handle and not recommended for home cooks. If you don’t have baking soda, you can skip the boiling step and just bake the dough balls, but they won’t have that authentic pretzel crust or chew. They’ll be more like soft bread rolls.
How do I reheat leftovers without them getting stale?
Never microwave them if you want them crispy. Use an oven or toaster oven at 350°F for 5-7 minutes. This revives the crust. If you must microwave, do it for 15-20 seconds and eat immediately, but expect a softer texture.
Pin This Recipe!


Soft Pretzel Bites: Easy 15-Min Weeknight Snack
- Total Time: 25 minutes
- Yield: 4-6 servings 1x
Description
A quick and easy weeknight snack featuring chewy, salty soft pretzel bites served with a creamy cheddar dip. Ready in just 15 minutes with minimal effort.
Ingredients
- 1 cup warm water
- 1 packet (2.25 tsp) active dry yeast
- 1 tablespoon granulated sugar
- 2.5 cups all-purpose flour
- 1 teaspoon salt
- 2 tablespoons melted butter
- 1/4 cup baking soda
- Coarse sea salt (for sprinkling)
- 1 cup freshly grated cheddar cheese
- 1/2 cup heavy cream
- 1/2 teaspoon garlic powder
- 1 teaspoon Worcestershire sauce
- Hot sauce (optional, to taste)
Instructions
- In a small bowl, combine warm water, sugar, and yeast. Stir gently and let sit for 5-10 minutes until foamy.
- In a large mixing bowl, combine flour and salt. Add the yeast mixture and melted butter. Stir until a shaggy dough forms.
- Knead the dough on low speed for 3-5 minutes or by hand for 5 minutes until smooth and elastic. Adjust with flour or water if needed.
- Divide dough into 12-15 equal pieces and roll each into a smooth ball.
- Bring a large pot of water to a boil. Stir in baking soda carefully. Drop dough balls into the water and boil for 30 seconds per side until they float.
- Remove boiled bites with a slotted spoon and place on a parchment-lined baking sheet.
- Preheat oven to 425°F (220°C). Brush bites with melted butter and sprinkle generously with coarse sea salt.
- Bake for 10-12 minutes until golden brown. Let cool for 2 minutes.
- While baking, combine heavy cream, cheddar, garlic powder, Worcestershire sauce, and hot sauce in a saucepan or microwave-safe bowl. Heat gently, stirring frequently, until smooth and melted.
Notes
Ensure water is warm but not hot when activating yeast. Do not skip the baking soda bath as it creates the authentic pretzel crust. Grate your own cheese for a smoother dip. Reheat leftovers in an oven or toaster oven to maintain crispness.
- Prep Time: 10 minutes
- Cook Time: 15 minutes
- Category: Snack
- Cuisine: American
Nutrition
- Serving Size: Approximately 2-3 bi
- Calories: 320
- Sugar: 3
- Sodium: 650
- Fat: 15
- Saturated Fat: 9
- Carbohydrates: 35
- Fiber: 2
- Protein: 12
Keywords: soft pretzel bites, weeknight snack, easy recipe, cheddar dip, quick dinner, family friendly, budget meal


