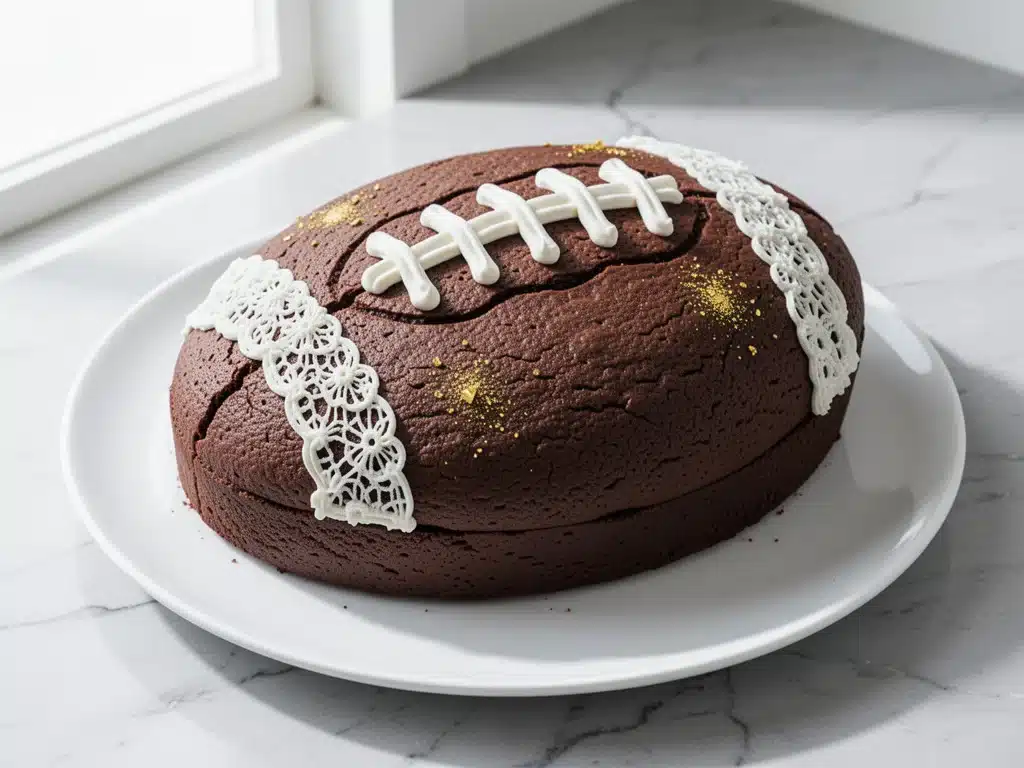
It was 6 PM on a Sunday, the TV was blaring the pre-game show, and my pantry looked like a disaster zone. I needed a dessert that screamed “football party” but also tasted like something you’d buy at a fancy bakery. I didn’t have time to bake individual cookies, and I definitely didn’t want to deal with a complicated cake that might flop when I was supposed to be watching the kickoff. So, I did what I always do when I’m stressed: I threw together a massive, soft-batch chocolate cookie cake, but I made it peanut butter because, well, peanut butter and chocolate is basically the holy grail of snacks.
The result? It was huge. It was messy. It was absolutely perfect. My husband cut into it with a fork while the game was on, and within ten minutes, half of it was gone. The next week, when we had friends over for the playoffs, I made it again—this time with the buttercream laces. And honestly? It’s become the star of every gathering. People don’t even talk about the game; they just ask, “Where did you get that cookie cake?”
This Football Party Peanut Butter Chocolate Cookie Cake with Buttercream Laces isn’t just a dessert; it’s a conversation starter. It’s thick, chewy, and studded with chocolate chips, topped with a swirl of vanilla buttercream that I pipe into little football laces. It’s easier than it looks, requires no special equipment, and tastes like a hug from your favorite baker. I’ve tested this recipe three times now (yes, three times, because I kept eating the batter), and I’ve finally nailed the ratio of peanut butter to chocolate that makes it irresistible. If you’re looking for a showstopper that actually works when you’re busy, this is it.
Why You’ll Love This Recipe
I know what you’re thinking. “Another cookie cake?” But hear me out. This one is different. It’s not just a flat disc of sugar. It’s a structural marvel of chewy dough and creamy frosting that actually holds up. Here’s why this Football Party Peanut Butter Chocolate Cookie Cake has taken over our game-day menu:
- It’s Built for Sharing — Seriously, this thing is huge. It serves 12-15 people easily, which is exactly what you need when a crowd shows up unannounced. I’ve served it at tailgates, living room watch parties, and even potlucks. Everyone grabs a slice, and nobody fights over the last piece because there are plenty.
- Zero Baking Stress — Unlike layered cakes that can collapse or soufflés that can deflate, this cookie cake is forgiving. You mix it, press it into a pan, and bake it. If it looks a little uneven, who cares? It’s supposed to look rustic and homemade. I’ve made this while on the phone with my mom, and it still turned out perfect.
- The Peanut Butter Factor — Most cookie cakes are just chocolate. This one has peanut butter in the dough, which adds this salty, rich depth that cuts through the sweetness. It’s the same magic you get in my peanut butter chocolate chip cookie cups, but in a giant, shareable format. The flavor combo is just unbeatable.
- The Lace Detail is Easier Than You Think — I was terrified of piping buttercream when I started. But once I realized I didn’t need a fancy tip, just a simple ziplock bag with the corner snipped off, it became the fun part. It’s not about being perfect; it’s about making it look festive. My kids love helping me pipe the laces, even if they look a bit wobbly.
- Make-Ahead Friendly — You can bake the cookie base up to two days in advance. Store it in the fridge, let it come to room temp, then add the frosting right before guests arrive. This is crucial for game day, because you don’t want to be baking while the game is starting. I prep the dough on Saturday and bake it Sunday morning, then chill it while I get ready.
This is my go-to when I need a dessert that feels impressive but doesn’t require a degree in pastry arts. It’s reliable, delicious, and always gets compliments.
Ingredients You’ll Need
Here’s the best part: you probably have most of this already. This recipe uses standard pantry staples, but the quality of a few key ingredients makes a huge difference. I’m not being pretentious here; I’m just saying that using real butter and good chocolate chips changes everything.
For the Peanut Butter Chocolate Cookie Base
Unsalted butter (1 cup / 226g) — Softened to room temperature. This is non-negotiable. Cold butter won’t cream properly with the sugar, and you’ll end up with dense cookies. I take mine out of the fridge 30 minutes before I start. If you’re in a rush, microwave it in 5-second bursts, but watch it closely.
Peanut butter (1 cup / 250g) — Use creamy, natural peanut butter. I prefer Jif or Skippy for this because they have that consistent texture, but if you’re using natural peanut butter (the kind where the oil separates), make sure to stir it really well until it’s uniform. Chunky peanut butter adds texture, but creamy is smoother and easier to mix.
Granulated sugar (1 cup / 200g) — This gives the cookies their crisp edges. Don’t swap this for brown sugar alone; you want that balance of crunch and chew.
Brown sugar (1 cup / 220g) — Packed. This adds moisture and chew. I use light brown sugar, but dark works too if you want a deeper molasses flavor.
Eggs (2 large) — Room temperature eggs incorporate better into the batter. If you forget, just place them in a bowl of warm water for 5 minutes.
Vanilla extract (2 teaspoons) — Use real vanilla, not imitation. It makes a subtle but noticeable difference in flavor.
All-purpose flour (2 ½ cups / 315g) — Spoon it into the measuring cup and level it off. Don’t scoop directly from the bag, or you’ll pack it down and end up with dry cookies.
Baking soda (1 teaspoon) — Makes the cookies spread and rise.
Salt (½ teaspoon) — Balances the sweetness. Don’t skip it, even if you like sweet cookies.
Chocolate chips (2 cups / 340g) — I use semi-sweet chocolate chips, but milk chocolate works if you have kids. I like to mix both for variety. The key is to use good quality chips, not the cheap stuff that turns to wax.
For the Vanilla Buttercream Laces

Butter (½ cup / 113g) — Softened. This needs to be very soft, almost melted, to whip up fluffy.
Confectioners’ sugar (3-4 cups / 360-480g) — You might not need all of it. Add gradually until you reach the right consistency.
Heavy cream (2-3 tablespoons) — Adjusts the thickness. Start with 2 tablespoons and add more if needed.
Vanilla extract (1 teaspoon) — For flavor.
Salt (¼ teaspoon) — To cut the sweetness.
Food coloring (optional) — I use a tiny dot of brown gel food coloring to make the “laces” look more like actual football laces, but white works too if you want a classic look.
Equipment Needed
You don’t need fancy gear for this. Here’s what I actually use, plus some alternatives if you’re short on space.
13×9 inch baking pan — This is the standard size for a cookie cake. I use a metal pan because it conducts heat evenly. Glass pans work too, but you might need to reduce the oven temperature by 25 degrees. My old, slightly dented pan still works perfectly.
Electric mixer — Handheld or stand mixer. You can do this by arm, but I’ve tried, and it’s a workout. A mixer ensures the butter and sugar are creamed properly, which is key for texture.
Mixing bowls — One large bowl for the wet ingredients, one medium for the dry. I use stainless steel because they’re durable and easy to clean.
Piping bag or ziplock bag — For the buttercream laces. I use a large ziplock bag and just snip off the corner. It’s cheaper and less hassle than a piping bag, and it works just as well.
Offset spatula — For spreading the buttercream evenly. A regular butter knife works too, but an offset spatula gives you more control. I have a cheap one from the dollar store that does the job.
Cooling rack — Essential for cooling the cookie cake before frosting. If you frost a warm cookie, the buttercream will melt and slide off. I learned this the hard way with a sad, melted mess on my first try.
How to Make It: Step-by-Step
Alright, let’s make this! I’m walking you through exactly how I do it, including the little tricks I’ve picked up over the years.
Step 1: Prep Your Pan and Oven (5 minutes)
Preheat your oven to 350°F (175°C). Grease your 13×9 inch baking pan with butter or non-stick spray. I like to line the bottom with parchment paper for easy removal, but it’s not strictly necessary. Just make sure the sides are well-greased so the cookies don’t stick.
Step 2: Cream the Butter and Sugars (3-4 minutes)
In a large bowl, beat the softened butter, peanut butter, granulated sugar, and brown sugar together on medium-high speed. This is the most important step. You want to beat it until it’s light, fluffy, and pale in color. This usually takes about 3 minutes. If you skip this, your cookies will be dense and flat. Scrape down the sides of the bowl with a spatula to make sure everything is incorporated.
Step 3: Add Eggs and Vanilla (2 minutes)
Add the eggs one at a time, beating well after each addition. Add the vanilla extract. The mixture might look slightly curdled at this point—don’t panic. It will come together once you add the flour. Just make sure there are no large lumps of butter left.
Step 4: Mix Dry Ingredients (1 minute)
In a separate bowl, whisk together the flour, baking soda, and salt. This ensures the baking soda is evenly distributed, so you don’t get bits of raw soda in your cookies.
Step 5: Combine Wet and Dry (2 minutes)
Gradually add the dry ingredients to the wet ingredients, mixing on low speed. Stop as soon as the flour disappears. Overmixing at this stage develops gluten, which makes the cookies tough. You want them soft and chewy, not bread-like. Fold in the chocolate chips with a spatula.
Step 6: Press into Pan (3 minutes)
Transfer the dough to your prepared pan. Use your hands or a spatula to press it evenly into the corners. It should be about half an inch thick. Don’t worry if it’s not perfectly smooth; it will spread in the oven. If you want a flatter cookie, press it down more. For a thicker, cake-like cookie, leave it a bit puffier.
Step 7: Bake (15-18 minutes)
Bake at 350°F for 15-18 minutes. The edges should be golden brown, and the center should look set but still slightly soft. It will continue to cook as it cools. If you bake it until the center is firm, it will be dry. I pull mine out when they look just barely done.
Step 8: Cool Completely (30 minutes)
Let the cookie cake cool in the pan for 10 minutes, then transfer it to a wire rack to cool completely. This step is crucial. If you try to frost it warm, the buttercream will melt. I usually bake it in the morning and frost it after lunch.
Step 9: Make the Buttercream (10 minutes)
While the cookie cools, make the frosting. Beat the softened butter until creamy. Add the vanilla, salt, and 3 cups of confectioners’ sugar. Beat on low until combined, then increase to high and beat for 2-3 minutes until fluffy. Add heavy cream one tablespoon at a time until you reach a piping consistency. If you’re adding food coloring, mix it in now.
Step 10: Frost and Pipe Laces (5 minutes)
Spread the buttercream evenly over the cooled cookie cake. Then, fill your piping bag (or ziplock bag) with the remaining frosting. Snip a small hole in the corner. Pipe lines down the length of the cookie cake to mimic football laces. Don’t worry about perfection; the rustic look is part of the charm. You can also pipe a border around the edge if you want to get fancy.
Expert Tips & Tricks
Here’s everything I’ve learned from making this dozens of times. These tips will save you from my mistakes.
Don’t Overbake — This is the #1 mistake. Cookie cakes continue to cook on the hot pan after you take them out of the oven. If the center looks firm, it’s overdone. Pull it out when it’s just set. It should still have a little give in the middle.
Room Temperature Ingredients — I can’t stress this enough. Cold butter, cold eggs, cold flour—they all throw off the emulsion. Take your butter and eggs out 30-60 minutes before you start. If you’re short on time, microwave the butter in 5-second bursts, and soak the eggs in warm water.
Measure Flour Correctly — Flour is the enemy of soft cookies. If you scoop it directly from the bag, you’ll pack it down and add too much. Spoon it into the measuring cup and level it off with a knife. This simple change makes a huge difference in texture.
Chill the Dough (Optional) — If your kitchen is hot, or if you want thicker cookies, chill the dough in the pan for 30 minutes before baking. This prevents them from spreading too much. I usually skip this step because I’m impatient, but it’s good to know.
Frosting Consistency — If your frosting is too stiff, add more cream, one teaspoon at a time. If it’s too runny, add more sugar. You want it thick enough to hold its shape when piped, but soft enough to spread easily.
Save Some Chips — I like to press a few extra chocolate chips onto the top of the cookie cake before baking. It makes it look more professional and ensures you get chocolate in every bite.
Use Gel Food Coloring — If you’re coloring your frosting, use gel coloring. Liquid food coloring adds too much water and can thin out your frosting. Gel coloring gives vibrant color without affecting consistency.
Variations & Substitutions
Once you’ve nailed the basic version, here’s how you can mix it up. I’ve tried all of these, and they all work.
Reese’s Cup Version — Instead of chocolate chips, press halved Reese’s Peanut Butter Cups into the dough before baking. It’s richer and more decadent. My kids love this version because it’s basically a giant Reese’s cup.
White Chocolate Chip — Swap the semi-sweet chips for white chocolate chips. It’s sweeter and milder, which pairs well with the peanut butter. I like to sprinkle sea salt on top after frosting to balance the sweetness.
Double Chocolate — Add ¼ cup of cocoa powder to the dry ingredients and use dark chocolate chips. It’s intense and chocolatey, perfect for serious chocolate lovers. Just be aware it will be darker and slightly denser.
Gluten-Free — Use a 1:1 gluten-free flour blend. I’ve used Bob’s Red Mill and King Arthur, and both work well. Just make sure the blend includes xanthan gum, or add ½ teaspoon yourself.
Dairy-Free — Use dairy-free butter and chocolate chips. The peanut butter is usually dairy-free, but check the label. The frosting will need dairy-free butter and non-dairy cream. It’s not quite the same, but it’s still tasty.
Vegan — Use flax eggs (2 tablespoons ground flaxseed mixed with 6 tablespoons water) instead of regular eggs, and dairy-free butter and chocolate chips. The texture will be slightly different, but it’s still good.
Mini Cookie Cakes — Divide the dough into mini muffin tins and bake for 10-12 minutes. These are great for portion control and party favors. They’re basically giant cookie cups.
Serving & Storage
How to Serve
I usually serve this straight from the pan at the dinner table—it looks rustic and stays warm. But here are other ways I’ve enjoyed it:
- Game Day Platter — Cut into squares and serve with plastic forks. It’s messy, but that’s part of the fun.
- Coffee Pairing — Serve with a cup of coffee or hot chocolate. The peanut butter and chocolate go perfectly with coffee.
- Ice Cream Sandwich — Cut a slice and top with a scoop of vanilla ice cream. It’s like a giant cookie sandwich.
Storage Instructions
Room Temperature: Store in an airtight container for up to 3 days. Place parchment paper between layers if you’re stacking them. It stays soft and chewy at room temperature.
Refrigerator: Store in the fridge for up to 5 days. The frosting will harden, so let it come to room temperature before serving. This is good if your kitchen is hot.
Freezer: You can freeze the unfrosted cookie cake for up to 2 months. Wrap it tightly in plastic wrap and then foil. Thaw in the fridge overnight, then frost. I don’t recommend freezing the frosted cake because the buttercream can get grainy when thawed.
Reheating: Warm individual slices in the microwave for 10-15 seconds. It brings back the soft, chewy texture. Don’t overheat it, or it will get hard.
Nutrition Information
I’m not a nutritionist, but here’s the breakdown if you’re tracking. This is a rich, indulgent dessert, so portion control is key.
Per Serving (based on 12 servings):
- Calories: 480
- Protein: 8g
- Carbs: 65g
- Fiber: 2g
- Sugar: 45g
- Fat: 22g
- Saturated Fat: 10g
- Cholesterol: 45mg
- Sodium: 250mg
What’s Good: It has some protein from the peanut butter and eggs. It’s also more filling than a slice of cake because it’s denser.
What to Know: It’s high in sugar and calories from the butter, sugar, and chocolate. Use this as a special treat, not an everyday snack. If you want to lighten it up, reduce the sugar by ¼ cup and use dark chocolate chips.
Final Thoughts
So that’s my go-to Football Party Peanut Butter Chocolate Cookie Cake! I’ve probably talked your ear off at this point, but when you make a recipe this often, you have a lot to say about it. This has saved game days more times than I can count. It’s my answer to “what’s for dessert” when I’m tired, don’t want takeout, and still want something that tastes really good. My kids are happy, my husband’s happy, and I’m happy because I’m not stressed about cooking.
Make it yours! Try different add-ins, swap in your favorite chocolate chips, or adjust the laces to match your team’s colors. The best recipes are the ones you adapt to your family’s tastes. If you make this, drop a comment and let me know what you think! I love hearing how recipes turn out in your kitchen. And if something doesn’t work, tell me that too—I’m here to help troubleshoot.
Happy cooking! And I hope your kitchen smells half as good as mine does right now.
Frequently Asked Questions
Can I use crunchy peanut butter instead of creamy?
Yes, you can! It adds a nice texture to the cookie. However, it might make the dough a bit harder to spread evenly into the pan. Just take your time pressing it in, and it’ll work fine. The flavor is the same, just with more crunch.
Why did my cookie cake spread too much?
This usually happens if the butter was too soft or if the flour was packed into the measuring cup. Make sure your butter is softened but not melted. Also, measure your flour correctly by spooning it into the cup. If it spreads too much, it’ll be thinner and crispier, which is still delicious, just different.
Can I make this ahead for a party?
Absolutely. Bake the cookie cake up to 2 days in advance. Let it cool completely, then wrap it tightly in plastic wrap. Store it at room temperature. Frost it the day of the party. This actually helps the flavors meld together, making it taste even better.
Can I freeze the frosted cookie cake?
I don’t recommend it. The buttercream can become grainy or separate when thawed. It’s better to freeze the unfrosted cookie cake and frost it fresh. If you must freeze the frosted one, wrap it tightly in plastic and foil, and thaw in the fridge overnight. It won’t be perfect, but it’ll still be tasty.
What if I don’t have a 13×9 pan?
You can use a 9×13 pan, but the cookies will be thicker. Bake time might need to be increased by 2-3 minutes. Or, you can use two 9×9 pans and split the dough. Just keep an eye on them, as baking times can vary.
Can I use almond butter instead of peanut butter?
Yes, almond butter works great. It has a milder flavor, so the cookie will taste more like a chocolate-almond cookie. It’s a bit more expensive, but if you’re allergic to peanuts, it’s a perfect substitute.
How do I get clean cuts on the cookie cake?
Use a sharp knife and wipe it clean between cuts. For cleaner slices, chill the cookie cake in the fridge for 15 minutes before cutting. The frosting will firm up, and the cookie will be easier to slice without crumbling.
Pin This Recipe!


Football Party Peanut Butter Chocolate Cookie Cake
- Total Time: 48 minutes
- Yield: 12-15 servings 1x
Description
A massive, soft-batch chocolate cookie cake studded with chocolate chips and infused with peanut butter, topped with vanilla buttercream piped into football laces. It is a forgiving, make-ahead dessert perfect for game day gatherings.
Ingredients
- 1 cup (226g) unsalted butter, softened
- 1 cup (250g) creamy peanut butter
- 1 cup (200g) granulated sugar
- 1 cup (220g) packed brown sugar
- 2 large eggs, room temperature
- 2 teaspoons vanilla extract
- 2 ½ cups (315g) all-purpose flour
- 1 teaspoon baking soda
- ½ teaspoon salt
- 2 cups (340g) semi-sweet chocolate chips
- ½ cup (113g) butter, softened (for frosting)
- 3–4 cups (360-480g) confectioners’ sugar (for frosting)
- 2–3 tablespoons heavy cream (for frosting)
- 1 teaspoon vanilla extract (for frosting)
- ¼ teaspoon salt (for frosting)
- Brown gel food coloring (optional)
Instructions
- Preheat oven to 350°F (175°C). Grease a 13×9 inch baking pan and line the bottom with parchment paper if desired.
- In a large bowl, beat the softened butter, peanut butter, granulated sugar, and brown sugar on medium-high speed until light, fluffy, and pale (about 3 minutes). Scrape down the sides.
- Add eggs one at a time, beating well after each addition. Mix in the vanilla extract.
- In a separate bowl, whisk together the flour, baking soda, and salt.
- Gradually add the dry ingredients to the wet ingredients on low speed. Mix just until the flour disappears. Fold in the chocolate chips.
- Press the dough evenly into the prepared pan, about half an inch thick.
- Bake for 15-18 minutes until edges are golden brown and the center looks set but slightly soft.
- Let the cookie cake cool in the pan for 10 minutes, then transfer to a wire rack to cool completely.
- While the cookie cools, beat the frosting butter until creamy. Add vanilla, salt, and 3 cups of confectioners’ sugar. Beat on low until combined, then high for 2-3 minutes until fluffy. Add heavy cream one tablespoon at a time until piping consistency is reached.
- Spread the buttercream evenly over the cooled cookie cake.
- Fill a piping bag or ziplock bag with remaining frosting. Snip a small corner and pipe lines down the length of the cake to mimic football laces.
Notes
Ensure butter and eggs are at room temperature for proper emulsion. Do not overbake; the center should still have a little give as it continues to cook on the hot pan. Measure flour by spooning it into the cup and leveling off to avoid dense cookies. The cookie base can be baked up to two days in advance and stored at room temperature before frosting.
- Prep Time: 30 minutes
- Cook Time: 18 minutes
- Category: Dessert
- Cuisine: American
Nutrition
- Serving Size: 1 slice
- Calories: 480
- Sugar: 45
- Sodium: 250
- Fat: 22
- Saturated Fat: 10
- Carbohydrates: 65
- Fiber: 2
- Protein: 8
Keywords: football party dessert, peanut butter chocolate cookie cake, game day snacks, easy cookie cake, buttercream laces, make ahead dessert


