I still remember the panic of standing in my kitchen at 4 PM, staring at a half-eaten bag of store-bought gluten-free cookies that tasted like cardboard and regret. My daughter had just been diagnosed with a gluten sensitivity, and suddenly, our Sunday afternoon tea ritual felt like a minefield. I wanted something that tasted indulgent, something that felt like a treat and not a “diet” compromise, but everything I tried was either too crumbly, too bland, or required ingredients I didn’t have on hand.
That Tuesday, I decided to stop buying and start making. I grabbed a jar of apricot jam that had been sitting in the back of my pantry for months and some almond flour. I didn’t have a fancy gluten-free flour blend. I didn’t have xanthan gum. I just had butter, sugar, jam, and a desperate need for a win. I pressed my thumb into the dough, filled the indentations, and popped them in the oven. When they came out golden and fragrant, my daughter took one bite and said, “Mom, these taste like the ones from the bakery.” That was the moment I knew I had cracked the code.
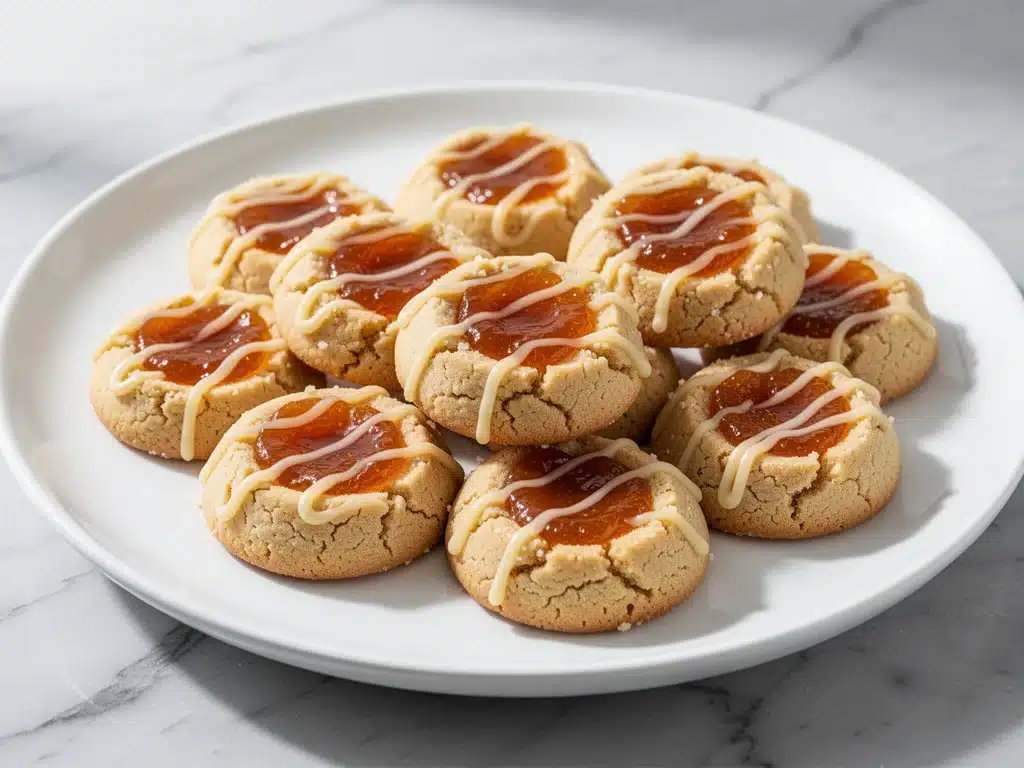
These gluten-free apricot thumbprint cookies with vanilla drizzle are my go-to when I need to impress guests or just need a little sweet comfort. They are tender, buttery, and hold their shape perfectly without falling apart—a common issue with GF baking. The apricot jam adds a tart-sweet punch that cuts through the rich vanilla drizzle, making each bite feel sophisticated yet completely approachable. I’ve made this recipe dozens of times, tweaking the ratios until it was foolproof, and I can promise you: it’s the easiest, most delicious gluten-free dessert you’ll ever make. It’s also incredibly forgiving, meaning even if your thumbs aren’t perfectly symmetrical, they’ll still taste amazing.
Why You’ll Love This Recipe
There are about ten reasons I keep making these gluten-free apricot thumbprint cookies, but here are the big ones that keep me coming back to the oven week after week.
Stupid Simple Ingredients — Seriously, if you can mix dough and press a thumb into it, you can make this. The base is just three ingredients: almond flour, butter, and powdered sugar. No weird gums, no expensive specialty blends. I’ve walked my teenage son through this recipe over FaceTime while he was at college, and he nailed it on the first try.
Lightning Fast — 20 minutes from start to finish. That’s it. I make these on weeknights when I get home exhausted and don’t want to order takeout or buy processed snacks. The dough comes together in a bowl, and the baking time is short enough that you’re not waiting around all afternoon.
Texture That Actually Works — The biggest fear with gluten-free baking is the “sand” texture. Almond flour gives these a tender, cake-like crumb that melts in your mouth. They aren’t dry or crumbly. They’re soft, chewy, and substantial. My husband, who isn’t even gluten-free, prefers these over regular butter cookies because they’re less sweet and more aromatic.
Crowd-Pleaser — I’ve served these to my celiac sister, my nut-allergic neighbor (using sunflower seed flour—more on that later), and my picky nephew. Everyone loves them. The apricot jam is universally liked, and the vanilla drizzle makes them feel fancy enough for a dinner party but casual enough for a school bake sale.
Makes Amazing Leftovers — These actually taste better the next day. The flavors meld together, and the jam softens slightly into the cookie. I deliberately make a double batch on Sundays so I have cookies for my afternoon snack all week long.
Budget-Smart — Almond flour can be pricey, but you don’t need much per cookie. Feeds a crowd of 15-20 people for under $10. That’s less than one trip to the bakery. I keep almond flour stocked specifically for recipes like this because the cost-per-cookie is negligible compared to the joy it brings.
This is my go-to when I need dessert to just work. No complicated techniques, no weird ingredients, just reliable, delicious food that makes everyone happy.
Ingredients You’ll Need
Here’s the best part: you probably have most of this already. I’m particular about a few things here, and I’ll tell you exactly why, but this list is short and sweet.
For the Cookie Base
Almond Flour (1 cup / 115g) — This is the star. Use fine, blanched almond flour. Coarse almond meal will make the cookies gritty. I buy mine in bulk from the grocery store to save money, but any high-quality brand works. It provides the structure and the nutty flavor.
Unsalted Butter (½ cup / 115g, softened) — Softened is key. You want it pliable, not melted. Melted butter changes the texture and makes them spread too much. Room temperature butter creams perfectly with the sugar to create that tender crumb.
Powdered Sugar (½ cup / 60g) — Also called confectioners’ sugar. Do not use granulated sugar here; it won’t dissolve into the dough properly and will make the cookies gritty. Powdered sugar adds sweetness and helps bind the almond flour.
Vanilla Extract (1 teaspoon) — Use real vanilla, not imitation. It adds warmth and depth. I use pure vanilla bean paste sometimes for a speckled look, but extract works just fine.
For the Filling and Drizzle

Apricot Jam (½ cup / 120g) — Look for a high-quality apricot preserves with chunks. It adds texture and bursts of flavor. Smooth jam works too, but I prefer the rustic feel of the chunks. If you can’t find apricot, peach or apricot-apricot blends work well.
Confectioners’ Sugar (2-3 tablespoons / 20-30g) — For the drizzle. Adjust based on how thick you want it.
Heavy Cream or Milk (1-2 teaspoons) — To thin the powdered sugar into a drizzle. Use whichever you have on hand.
Pinch of Salt — Always add a tiny pinch to balance the sweetness. It enhances the almond flavor.
Substitutions
Gluten-Free Flour Blend — If you’re allergic to nuts, you can use a 1:1 gluten-free baking blend (like Bob’s Red Mill). Add 1 tablespoon of xanthan gum if your blend doesn’t include it. The texture will be slightly more cake-like than nutty, but still delicious.
Coconut Flour — Not recommended. It absorbs too much moisture and changes the texture completely. Stick to almond or GF blend.
Jam Variations — Raspberry, strawberry, or even lemon curd work beautifully. Apricot is classic, but don’t be afraid to swap based on what’s in season.
Equipment Needed
You don’t need fancy equipment for this. Here’s what I actually use.
Mixing Bowls — One medium bowl for the dough, one small for the drizzle. I use a standard 2-quart bowl for the dough. It’s big enough to mix comfortably without spilling.
Measuring Cups and Spoons — For the flour and sugar, accuracy matters. I use standard 1-cup and ½-cup measures. For the jam, a ½ cup measure is handy.
Parchment Paper — Essential for lining your baking sheet. Almond flour cookies can stick if you don’t use parchment. I never skip this step. It also makes cleanup a breeze.
Baking Sheet — A standard 9×13 or half-sheet pan. I use a heavy-gauge aluminum pan for even baking. Dark pans might brown the bottoms too quickly, so keep an eye on them.
Spoon or Small Scoop — For portioning the dough. I use a 1-tablespoon cookie scoop for consistency. If you don’t have one, a small melon baller or just your hands work fine.
Fork — Optional, for flattening the dough balls if your thumbs aren’t feeling it. A fork works great for a rustic look.
Piping Bag or Ziploc Bag — For the vanilla drizzle. I just snip the corner off a Ziploc bag. It’s the easiest way to get a nice, thin drizzle without a mess.
Wire Cooling Rack — To cool the cookies completely before drizzling. If you drizzle them while warm, the sugar will melt off. Patience pays off here.
How to Make It: Step-by-Step
Alright, let’s make this! I’m walking you through exactly how I do it, including the little tricks I’ve picked up.
Step 1: Prep Your Oven and Pan (2 minutes)
Preheat your oven to 350°F (175°C). Line a large baking sheet with parchment paper. This is non-negotiable. I’ve tried greasing the pan once, and the cookies stuck badly. Parchment paper ensures easy release and even browning. Set your timer for 12 minutes so you don’t forget them.
Step 2: Mix the Dough (5 minutes)
In a medium bowl, combine the softened butter and powdered sugar. Use a wooden spoon or a hand mixer on low speed. Cream them together until smooth and combined. It shouldn’t take long—maybe 2-3 minutes. The mixture should look like wet sand. Add the vanilla extract and salt. Mix briefly to combine.
Now, add the almond flour. Mix until just combined. Do not overmix. The dough will come together into a soft, pliable ball. If it feels too dry, add 1 teaspoon of milk. If it’s too sticky, add a sprinkle more almond flour. It should feel like playdough—easy to roll but not sticky to the touch.
Step 3: Shape the Cookies (5 minutes)
Take about 1 tablespoon of dough and roll it into a ball between your palms. Place it on the prepared baking sheet, about 2 inches apart. They won’t spread much, but give them room.
Here’s the thumbprint part. Press your thumb into the center of each ball, creating a small indent. Go about ½ inch deep. Don’t press all the way to the bottom; you want a little cookie around the edges to hold the jam. If the dough cracks, just press it back together. It happens sometimes with almond flour. Roll another ball and patch it. No one will know.
Repeat with the rest of the dough. You should get about 15-18 cookies, depending on how big you make them.
Step 4: Add the Jam (2 minutes)
Take a small spoon or your finger and add a generous ¼ teaspoon of apricot jam into each indent. Don’t overfill it. If you add too much, it will spill over and burn on the pan. A little goes a long way. The jam will bubble up slightly as it bakes, so leave some room.
Pro Tip: If your jam is very thick, microwave it for 10 seconds to loosen it up. This makes it easier to spoon into the indentations without tearing the dough.
Step 5: Bake (12-14 minutes)
Place the baking sheet in the preheated oven. Bake for 12-14 minutes. You’re looking for the edges to turn a light golden brown. The centers might still look soft, but they will firm up as they cool. Do not overbake. Almond flour burns easily, so keep an eye on them after the 12-minute mark.
Remove from the oven and let them cool on the baking sheet for 5 minutes. Then transfer to a wire rack to cool completely. This step is crucial. If you try to drizzle them while warm, the vanilla sugar will melt into the jam and disappear. Wait until they’re room temperature.
Step 6: Make the Vanilla Drizzle (2 minutes)
While the cookies cool, make the drizzle. In a small bowl, whisk together the powdered sugar and 1 teaspoon of heavy cream or milk. Add more liquid, ½ teaspoon at a time, until you reach a drizzle-able consistency. It should be thin enough to flow but thick enough to stay on the cookie.
Transfer the glaze to a Ziploc bag and snip off a tiny corner. Or use a piping bag. Drizzle over the cooled cookies in a zigzag pattern. Don’t worry about being perfect. The rustic look is part of the charm.
Visual Cue: The drizzle should set within 10-15 minutes. If it’s too wet, wait a bit longer. If it’s too thick, add another drop of milk.
Expert Tips & Tricks
Here’s everything I’ve learned from making this dozens of times. These tips will save you from my mistakes.
Butter Temperature Matters
Softened butter is crucial. If it’s too cold, the dough will be crumbly and hard to shape. If it’s melted, the cookies will spread too thin. Test it by pressing your finger into it—it should leave an indent but not feel greasy.
Don’t Skip the Parchment
I know it’s extra cleanup, but almond flour cookies are delicate. They stick to bare metal pans. Parchment paper is your best friend here. I also recommend using a fresh sheet if you’re baking multiple batches, as the residue from the first batch can cause sticking.
Jam Quantity Control
It’s tempting to fill the indentations to the brim, but resist. The jam expands when heated. A quarter-teaspoon is perfect. If you want more jam flavor, you can add a second drizzle of jam after baking, but that’s optional.
Cool Completely
I know it’s hard to wait. But warm cookies + sugar glaze = a mess. The glaze will slide right off. Let them cool on a wire rack for at least 20 minutes. This also helps the almond flour set, making the cookies firmer and less likely to crumble when you pick them up.
Storage is Key
Store these in an airtight container at room temperature for up to 5 days. The jam keeps them moist. If you live in a humid climate, add a slice of bread to the container to absorb excess moisture. The cookies will stay soft for days.
Freezing Dough
You can freeze the dough balls before baking. Roll them, place them on a baking sheet, and freeze until solid. Then transfer to a freezer bag. Bake straight from frozen, adding 2-3 minutes to the bake time. This is great for meal prep or gifting.
Variations & Substitutions
Once you’ve nailed the basic version, here’s how you can mix it up. I’ve tried all of these.
Chocolate Chip Version
Add ½ cup of semi-sweet chocolate chips to the dough. Press the chips into the top after baking for a gooey finish. This is a favorite among kids.
Lemon Glaze
Swap the vanilla drizzle for a lemon glaze. Use lemon juice instead of milk and add the zest of one lemon. The lemon and apricot combo is bright and refreshing, perfect for spring.
Raspberry Swirl
Use raspberry jam instead of apricot. The tartness of raspberry pairs beautifully with the almond flour. You can also swirl a little cream cheese into the dough for a cheesecake-like flavor.
Coconut Variation
Add ½ cup of shredded coconut to the dough. It adds a nice chew and tropical flavor. Drizzle with a coconut cream glaze for extra richness.
Dietary Modifications
Nut-Free: Use a 1:1 gluten-free flour blend and add 1 tablespoon of xanthan gum. The texture will be slightly different but still tasty.
Dairy-Free: Use vegan butter and a dairy-free jam. The drizzle can be made with coconut milk. It works well, though the flavor is slightly less rich.
Sugar-Free: Use a sugar-free powdered sugar substitute. Note that these often have a different texture, so the dough might be stickier. Adjust with more almond flour as needed.
Serving & Storage
How to Serve:
I usually serve these with a cup of tea or coffee. They pair beautifully with an iced vanilla chai latte for a cozy afternoon treat. They also look stunning on a dessert board, alongside other sweet bites. If you’re hosting a party, arrange them on a tiered stand for a bakery-style presentation.
Side Dishes:
These are desserts on their own, but if you need a savory balance, pair them with a sharp cheddar cheese or a slice of fall charcuterie board elements like dried fruits and nuts. They also complement fudgy mint chocolate brownies if you’re making a mixed dessert tray.
Storage Instructions:
Refrigerator: Store in an airtight container for up to 1 week. The fridge can dry them out, so make sure the container is sealed tight. Bring to room temperature before serving for the best texture.
Freezer: Freeze baked cookies for up to 3 months. Thaw at room temperature. Do not freeze with the drizzle, as it can become sticky. Drizzle after thawing.
Reheating: These are best at room temperature. If you want them warm, microwave for 10 seconds. Don’t overheat, or the jam will become runny.
Pro Tip: If you’re gifting these, wrap them in a cellophane bag with a ribbon. They make a lovely homemade gift. Just make sure they’re completely cool before packaging to prevent condensation.
Nutrition Information
I’m not a nutritionist, but here’s the breakdown if you’re tracking. Keep in mind that almond flour is higher in calories but also higher in healthy fats and protein than wheat flour.
Per Cookie (based on 18 cookies):
- Calories: 85
- Protein: 2g
- Carbs: 6g
- Fiber: 1g
- Sugar: 4g
- Fat: 6g
- Saturated Fat: 2g
What’s Good:
- Gluten-free and nut-free options available
- Higher in healthy fats from almond flour
- Low carb compared to traditional cookies
What to Know:
- Higher in calories due to almond flour
- Contains nuts (unless substituted)
- Contains dairy (unless substituted)
My Take:
Look, these are cookies. They’re meant to be enjoyed. The almond flour makes them more filling than a sugar cookie, so you might find yourself eating fewer of them. I usually have one or two with my coffee. They’re a treat, not a snack. When I want to make it lighter, I reduce the powdered sugar in the drizzle. But usually? I just enjoy them and appreciate the lack of gluten-related stomach issues.
Final Thoughts
So that’s my go-to gluten-free apricot thumbprint cookies with vanilla drizzle! I’ve probably talked your ear off at this point, but when you make a recipe this often, you have a lot to say about it.
This recipe has saved my sanity during gluten-free baking experiments. It’s my answer to “what’s for dessert” when I want something elegant but easy. My kids are happy, my guests are impressed, and I’m happy because I’m not stressed about complicated ingredients or long bake times.
Make it yours! Try different jams, swap the vanilla for almond extract, or add a sprinkle of sea salt on top. The best recipes are the ones you adapt to your family’s tastes. If you make this, drop a comment and let me know what you think! I love hearing how recipes turn out in your kitchen. And if something doesn’t work, tell me that too—I’m here to help troubleshoot.
Happy baking! And I hope your kitchen smells half as good as mine does right now.
Frequently Asked Questions
Can I use almond meal instead of almond flour?
You can, but the texture will be different. Almond meal is coarser and has more skin, which makes the cookies gritty. Almond flour is finely ground and blanched, giving a smoother, more tender result. If you only have almond meal, pulse it in a food processor until it’s fine. It won’t be perfect, but it’ll still taste good.
Why did my cookies spread too much?
This usually happens if the butter was too warm or melted. Make sure your butter is softened, not liquid. Also, check your oven temperature. If your oven runs hot, the butter melts too quickly before the structure sets. Use an oven thermometer to verify the temperature.
Can I freeze the dough?
Yes! Roll the dough into balls, place them on a baking sheet, and freeze until solid. Then transfer to a freezer bag. Bake straight from frozen, adding 2-3 minutes to the bake time. This is great for having ready-to-bake cookies on hand.
What if I don’t have apricot jam?
Use whatever jam you have. Raspberry, strawberry, blueberry, or even peach work beautifully. Lemon curd is also a fantastic option for a tangier flavor. The key is to use a thick jam so it doesn’t spill over during baking.
Can I make these nut-free?
Yes. Use a 1:1 gluten-free flour blend instead of almond flour. Add 1 tablespoon of xanthan gum if your blend doesn’t include it. The texture will be slightly more cake-like, but they’ll still be delicious. Just make sure your jam and other ingredients are certified nut-free if you have a severe allergy.
How do I get the drizzle to stick?
The cookies must be completely cool. If they’re even slightly warm, the sugar will melt and slide off. Let them cool on a wire rack for at least 20 minutes. If the drizzle is too thick, add more milk. If it’s too thin, add more powdered sugar.
Can I double this recipe?
Absolutely. Double all the ingredients and use a larger mixing bowl. The baking time stays the same. I do this when I’m meal-prepping or feeding a crowd. Just make sure you have enough parchment paper for multiple baking sheets.
Pin This Recipe!

Gluten-Free Apricot Thumbprint Cookies: 3-Ingredient Best Recipe
- Total Time: 20 minutes
- Yield: 15-18 cookies 1x
Description
These tender, buttery gluten-free apricot thumbprint cookies are made with just almond flour, butter, and sugar, filled with apricot jam and finished with a vanilla drizzle. They are easy to make, crowd-pleasing, and perfect for any occasion.
Ingredients
- 1 cup (115g) fine blanched almond flour
- ½ cup (115g) unsalted butter, softened
- ½ cup (60g) powdered sugar
- 1 teaspoon vanilla extract
- Pinch of salt
- ½ cup (120g) apricot jam
- 2–3 tablespoons powdered sugar (for drizzle)
- 1–2 teaspoons heavy cream or milk (for drizzle)
Instructions
- Preheat oven to 350°F (175°C) and line a baking sheet with parchment paper.
- In a medium bowl, cream together the softened butter and powdered sugar until smooth.
- Mix in the vanilla extract and salt.
- Add the almond flour and mix until just combined to form a soft, pliable dough.
- Roll the dough into 1-tablespoon balls and place them on the prepared baking sheet, 2 inches apart.
- Press your thumb into the center of each ball to create an indent about ½ inch deep.
- Fill each indent with about ¼ teaspoon of apricot jam.
- Bake for 12-14 minutes until edges are lightly golden brown.
- Cool on the baking sheet for 5 minutes, then transfer to a wire rack to cool completely.
- Whisk together powdered sugar and cream/milk to create a drizzle consistency.
- Drizzle the cooled cookies with the vanilla glaze and let set before serving.
Notes
Ensure butter is softened, not melted, to prevent spreading. Cool cookies completely before drizzling to prevent the glaze from melting. Store in an airtight container at room temperature for up to 5 days.
- Prep Time: 14 minutes
- Cook Time: 12-14 minutes
- Category: Dessert
- Cuisine: American
Nutrition
- Serving Size: 1 cookie
- Calories: 85
- Sugar: 4
- Fat: 6
- Saturated Fat: 2
- Carbohydrates: 6
- Fiber: 1
- Protein: 2
Keywords: gluten-free, apricot thumbprint cookies, almond flour cookies, easy dessert, gluten-free baking, dairy-free option, nut-free option


