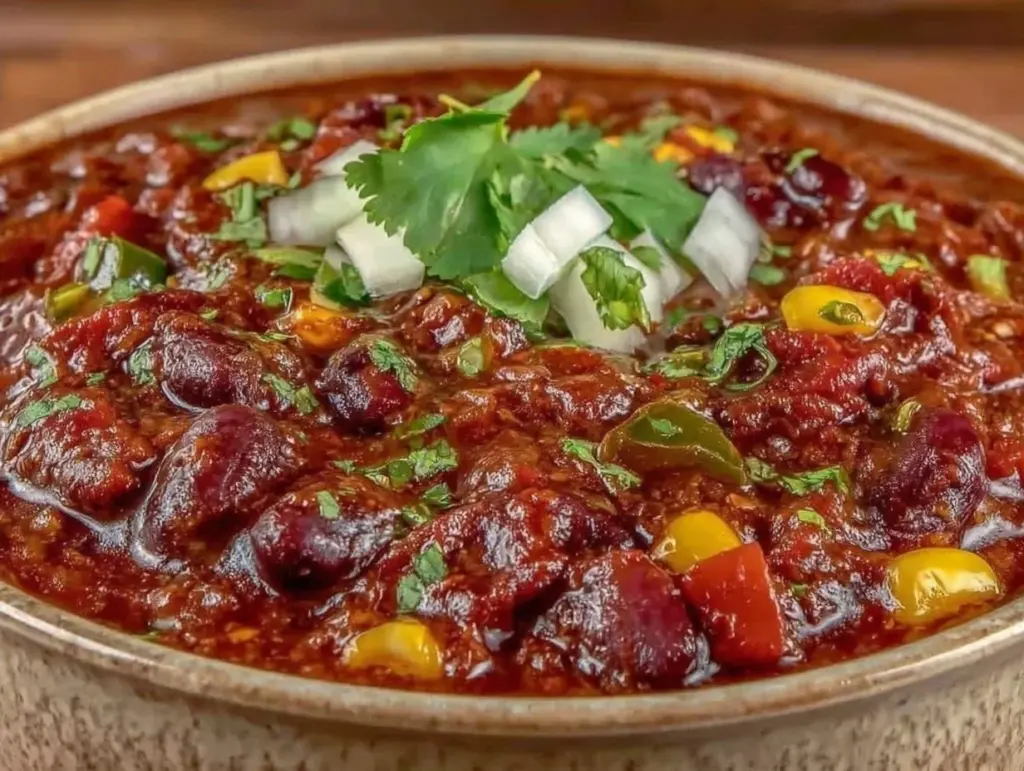
I have a confession to make. For years, I avoided making chili from scratch. Not because I didn’t like it, but because I thought it was this complicated, time-consuming project that required seven different spices, a trip to a specialty store, and a level of culinary confidence I simply didn’t possess. I bought the cans. I heated them up. I called it dinner. It was fine. But it wasn’t good.
Then, three years ago, I was feeling lazy. I had some black beans in the pantry, a few ears of corn, and a bag of onions. I figured, “What’s the worst that could happen?” I threw everything into one pot, added some basic spices I already had, and let it simmer. When I tasted it, I stopped mid-bite. It was smoky, sweet, hearty, and deeply satisfying. It tasted like it had been simmering all day, even though it took me 30 minutes of active time.
That was the moment I realized I’d been overcomplicating things. This healthy vegetarian chili with black beans and corn isn’t just a recipe; it’s a lesson in simplicity. It’s the kind of dish that proves you don’t need fancy ingredients or complicated techniques to make something incredible. It’s forgiving, it’s flavorful, and honestly? You really can’t mess it up.
If you’re looking for a weeknight dinner that feels like a hug in a bowl, this is it. I’ve made this creamy butternut squash sage soup for cozy nights, but this chili is my go-to when I want something robust and filling without the heavy meat-heavy guilt. Let’s get into why this pot of goodness belongs in your regular rotation.
Why You’ll Love This Recipe
There are a million chili recipes out there. So why this one? Why the black beans? Why the corn? Why this specific combination of spices?
Here’s the truth: This healthy vegetarian chili with black beans and corn hits the sweet spot between comfort food and actual nutrition. It’s not a salad, but it’s not a calorie bomb either. It’s hearty enough to keep you full for hours, thanks to the fiber and protein from the beans, but light enough that you won’t feel sluggish afterward.
But let’s be real. The main reason I keep making this isn’t just the health benefits. It’s the ease. Seriously. If you can open a can and chop an onion, you can master this. I’ve made this chili while helping my kid with homework, while watching a movie, and even while on a FaceTime call with my mom. It’s that forgiving.
Here’s what makes this one a keeper:
- One-Pot Wonder — I’m talking one pot. One spoon. One cleanup. This is huge for me. I hate doing dishes. This recipe respects my time and my energy levels. It’s the ultimate low-effort, high-reward dinner.
- Pantry Staples — You probably have 80% of these ingredients right now. Canned black beans? Check. Corn? Check. Onions and garlic? Check. Spices? You likely have cumin and chili powder in your cupboard. No special trips needed.
- Flavor That Deepens — Unlike some dishes that are best eaten immediately, this healthy vegetarian chili with black beans and corn actually gets better the next day. The flavors meld together overnight, making the second batch taste richer and more complex. I often make a double batch just for the leftovers.
- Customizable Comfort — Want it spicy? Add jalapeños. Want it creamy? Stir in some sour cream or avocado. Want more veggies? Throw in some bell peppers or spinach. This recipe is a blank canvas that lets you cook to your taste.
This is my answer to “what’s for dinner?” when I want something substantial but don’t want to spend hours in the kitchen. It’s reliable. It’s delicious. And it’s going to save you from ordering takeout at least once a month.
Ingredients You’ll Need
Here’s the best part: this ingredient list is short. I’m not asking you to hunt down obscure spices or exotic produce. This is simple, honest food. I’m particular about a few things here, but mostly, you just need good basics.
For the Base
Onion (1 large, diced / about 200g) — Yellow onions are my go-to. They’re sweet when cooked down and add that foundational flavor. Red onions work too, but they’re a bit sharper. White onions? Too pungent for this. Stick with yellow.
Garlic (4 cloves, minced / about 2 tablespoons) — Fresh garlic is non-negotiable here. Jarred garlic has a weird metallic aftertaste that really clashes with the smoky spices. Mince it yourself. It takes two minutes and makes a world of difference.
Black Beans (2 cans, 15 oz each / drained and rinsed / about 850g total) — The star of the show. Rinse them well to remove that tinny canning liquid. I use the standard canned kind because it’s easy, but if you’re soaking your own dried beans, use about 3 cups of cooked beans.
Corn (1 can, 15 oz / or 1.5 cups frozen / about 425g) — Sweet corn balances the savory beans. Canned is fine, but frozen corn actually has a better texture and sweeter flavor. If you use frozen, don’t thaw it—just toss it in.
Diced Tomatoes (1 can, 14.5 oz / about 410g) — I use fire-roasted tomatoes if I can find them. They add this incredible smoky depth that regular tomatoes just don’t have. If you can’t find fire-roasted, regular diced tomatoes with their juices are perfectly fine.
For the Flavor

Vegetable Broth (1 cup / 240ml) — I use low-sodium broth so I can control the saltiness. Chicken broth works if you’re not strictly vegetarian, but veggie broth keeps it plant-based and light.
Chili Powder (2 tablespoons) — Not just “chili powder” from the bottom of a jar, but a good quality blend. I like McCormick or simply organic. This is the main spice flavor.
Cumin (1 teaspoon, ground) — Earthy and warm. Essential for that classic chili taste. Don’t skip it. It’s what makes it smell like chili.
Smoked Paprika (1 teaspoon) — This is the secret weapon. It adds that smoky, bacon-like flavor without any meat. If you don’t have smoked paprika, regular paprika works, but you’ll miss that depth.
Salt and Black Pepper — To taste. I usually start with 1 teaspoon of salt and ½ teaspoon of pepper, then adjust after simmering.
Optional Add-ins
Bell Peppers (1 medium, diced) — I love adding a red or green bell pepper for extra crunch and sweetness. It’s not traditional, but it adds a nice texture contrast.
Jalapeño (1, seeded and diced) — For heat. If you’re sensitive to spice, remove the seeds and ribs. If you like it hot, leave them in.
Avocado (1, sliced) — For serving. Creamy, cool, and rich. Perfect topping.
Sour Cream or Greek Yogurt — A dollop on top adds tang and creaminess. Greek yogurt is a lighter option if you’re watching calories.
Equipment Needed
You don’t need fancy gadgets for this. Here’s what I actually use, and what works just as well.
Large Dutch Oven or Heavy-Bottomed Pot — I use a 6-quart Dutch oven. It needs to be big enough to hold all the beans and liquid without overflowing. A heavy bottom ensures even heating so nothing burns. If you don’t have a Dutch oven, a large stockpot or even a big skillet with a lid works.
Sharp Chef’s Knife — For chopping onions and garlic. A dull knife is dangerous and frustrating. Keep it sharp.
Wooden Spoon — For stirring. Silicone works too. Don’t use metal if you have a non-stick pot.
Measuring Cups and Spoons — Standard stuff. Dollar store versions are fine.
Can Opener — Obvious, but don’t forget it!
Colander — For rinsing the beans. Or just use a sieve under the tap.
Optional: Ladle — For serving. Makes it easier to scoop without spilling.
How to Make It: Step-by-Step
Alright, let’s make this! I’m walking you through exactly how I do it, including the little tricks I’ve picked up over the years. It’s simple, but there are a few key moments to watch.
Step 1: Prep Your Ingredients (5 minutes)
Before you turn on the stove, chop your onion and mince your garlic. Rinse your beans and corn. Measure out your spices. I know it seems like extra work, but having everything ready means you won’t burn the garlic while you’re looking for the cumin. Trust me on this.
Step 2: Sauté the Aromatics (5 minutes)
Heat a tablespoon of olive oil in your large pot over medium heat. Add the diced onion and a pinch of salt. Cook for 3-4 minutes until the onion is soft and translucent. Then add the garlic and cook for 1 more minute. The garlic should smell amazing, not brown. If it starts to turn dark, lower the heat immediately.
Step 3: Bloom the Spices (1 minute)
This is the step most people skip, but it’s crucial. Add the chili powder, cumin, and smoked paprika to the pot. Stir constantly for about 30-60 seconds. You’ll see the spices darken slightly and smell incredibly fragrant. This “blooms” the spices, releasing their essential oils and intensifying the flavor. It’s a game-changer.
Step 4: Add the Liquids and Beans (2 minutes)
Pour in the diced tomatoes (with their juices), the rinsed black beans, the corn, and the vegetable broth. Stir everything together. Scrape any browned bits from the bottom of the pot—those are flavor bombs.
Step 5: Simmer (20 minutes)
Bring the chili to a boil, then reduce the heat to low. Cover the pot partially (leave a small gap for steam to escape) and let it simmer for 20 minutes. This is when the magic happens. The flavors meld, the beans soften further, and the sauce thickens. Stir occasionally to prevent sticking.
Step 6: Adjust and Serve
Taste the chili. Does it need more salt? More pepper? A squeeze of lime juice for brightness? Adjust to your liking. Serve hot, topped with avocado, sour cream, or fresh cilantro. It’s that simple.
Total Time: About 30 minutes (10 minutes active, 20 minutes simmering).
Expert Tips & Tricks
Here’s everything I’ve learned from making this dozens of times. These tips will save you from my mistakes.
Rinse Your Beans Well
I can’t stress this enough. Canned beans have that starchy, metallic liquid. Rinse them under cold water until the bubbles stop. It makes a huge difference in the final taste.
Don’t Skip the Bloom
Adding spices to the oil before adding the liquid is what gives this chili its depth. If you add them directly to the tomatoes, they won’t release their full flavor. Take that extra minute.
Use Fire-Roasted Tomatoes
If you can find them, buy fire-roasted diced tomatoes. They add a smoky, charred flavor that mimics the taste of slow-cooked meat. It’s the easiest way to boost the flavor profile without extra effort.
Let It Rest
If you can wait, let the chili sit off the heat for 10-15 minutes before serving. It thickens slightly and the flavors settle. It’s not necessary, but it’s nice.
Common Mistakes
- Too Watery: If your chili is too thin, simmer it uncovered for another 10-15 minutes. The liquid will reduce.
- Too Spicy: If you accidentally added too much chili powder, add a splash of broth or a dollop of sour cream to balance it.
- Bland: If it tastes flat, add a squeeze of lime juice or a teaspoon of vinegar. Acid brightens up heavy dishes.
Variations & Substitutions
Once you’ve nailed the basic version, here’s how you can mix it up. I’ve tried all of these.
Spicy Version
Add a diced jalapeño with the onions, or a teaspoon of cayenne pepper. For extra heat, top with sliced jalapeños or hot sauce.
Vegetable-Loaded
Add diced bell peppers, zucchini, or spinach. I love adding spinach in the last 5 minutes of simmering—it wilts right in and adds nutrients.
Meat Lover’s
Add browned ground beef or turkey. Sauté it with the onions before adding the spices. This turns it into a classic meat chili.
Gluten-Free
This recipe is naturally gluten-free. Just make sure your vegetable broth and spices are certified gluten-free.
Dairy-Free
Skip the sour cream or use a dairy-free alternative. The chili is naturally dairy-free otherwise.
Serving & Storage
How to Serve:
I usually serve this straight from the pot. It looks rustic and hearty. Great sides include cornbread, rice, or a simple green salad. I love it with crispy baked fish tacos on the side for a fun taco-chili night.
Toppings Bar:
When I have guests, I put out: extra avocado, sour cream, shredded cheese, cilantro, lime wedges, and jalapeños. Everyone customizes their bowl.
Storage:
Store in an airtight container in the fridge for up to 5 days. It actually tastes better the next day! Freeze in portions for up to 3 months. Thaw in the fridge overnight and reheat gently.
Reheating:
Reheat on the stove over medium-low heat, adding a splash of broth if it’s too thick. Microwave works too, but stir occasionally to prevent hot spots.
Nutrition Information
I’m not a nutritionist, but here’s the breakdown if you’re tracking. This is per serving (based on 6 servings).
- Calories: 280
- Protein: 14g
- Carbs: 42g
- Fiber: 12g
- Sugar: 6g
- Fat: 6g
- Sodium: 450mg
It’s high in fiber and protein, low in fat, and packed with vitamins. It’s a genuinely healthy meal that doesn’t taste like “diet food.” Just don’t drown it in cheese and sour cream if you’re watching calories!
Final Thoughts
So that’s my healthy vegetarian chili with black beans and corn. It’s simple, it’s delicious, and it’s incredibly forgiving. I’ve made this recipe so many times that I could probably make it in my sleep. And honestly? That’s the highest compliment I can give a recipe.
It’s the kind of dish that brings comfort to the table without the stress. It’s perfect for chilly evenings, potlucks, or just when you want to feel good about what you’re eating. Make it yours. Add extra veggies, make it spicier, or keep it simple. The choice is yours.
If you make this, drop a comment and let me know what you think! I love hearing how recipes turn out in your kitchen. And if something doesn’t work, tell me that too—I’m here to help.
Happy cooking! And I hope your kitchen smells as good as mine does right now.
Frequently Asked Questions
Can I use dried beans instead of canned?
Yes! But you’ll need to soak them overnight and cook them until tender first. Use about 3 cups of cooked beans. Canned is just faster, which is why I usually use it.
Why is my chili too watery?
This usually happens if you used too much broth or didn’t simmer long enough. Simmer it uncovered for another 15-20 minutes to reduce the liquid. You can also add a tablespoon of cornstarch mixed with water to thicken it quickly.
Can I freeze this chili?
Absolutely. Let it cool completely, then portion it into freezer bags or containers. It lasts for up to 3 months. Thaw in the fridge overnight before reheating.
Is this chili spicy?
Not really. It has a mild kick from the chili powder, but it’s not hot. If you want more heat, add jalapeños or cayenne pepper. If you want less, reduce the chili powder to 1 tablespoon.
Can I make this in a slow cooker?
Yes! Sauté the onions and garlic first, then add everything to the slow cooker. Cook on low for 6-8 hours or high for 3-4 hours. It’s even easier!
What can I serve with this chili?
Cornbread is classic. Rice, quinoa, or even baked potatoes work great. I also love it with a side of homemade peach iced tea for a refreshing contrast.
Can I add meat to this?
Of course! Browned ground beef, turkey, or chicken work well. Add them with the onions and cook until browned before adding the spices.
Pin This Recipe!


Healthy Vegetarian Chili: The Easy One-Pot Recipe You Cant Mess Up
- Total Time: 30 minutes
- Yield: 6 servings 1x
Description
A simple, forgiving, and hearty vegetarian chili made with black beans and corn. This one-pot meal is ready in 30 minutes, uses pantry staples, and tastes even better the next day.
Ingredients
- 1 large yellow onion, diced
- 4 cloves garlic, minced
- 2 cans (15 oz each) black beans, drained and rinsed
- 1 can (15 oz) corn (or 1.5 cups frozen corn)
- 1 can (14.5 oz) diced tomatoes (fire-roasted recommended)
- 1 cup vegetable broth (low-sodium)
- 2 tablespoons chili powder
- 1 teaspoon ground cumin
- 1 teaspoon smoked paprika
- 1 tablespoon olive oil
- Salt and black pepper to taste
- Optional: 1 bell pepper, diced; 1 jalapeño, seeded and diced; avocado for serving; sour cream or Greek yogurt for serving
Instructions
- Prep ingredients: Dice the onion, mince the garlic, and rinse the beans and corn. Measure out spices.
- Sauté aromatics: Heat olive oil in a large pot over medium heat. Add diced onion and a pinch of salt; cook for 3-4 minutes until soft. Add garlic and cook for 1 minute until fragrant.
- Bloom spices: Add chili powder, cumin, and smoked paprika to the pot. Stir constantly for 30-60 seconds until fragrant.
- Combine ingredients: Add diced tomatoes (with juices), black beans, corn, and vegetable broth. Stir to combine and scrape up any browned bits from the bottom of the pot.
- Simmer: Bring to a boil, then reduce heat to low. Partially cover and simmer for 20 minutes, stirring occasionally.
- Adjust and serve: Taste and adjust seasoning with salt, pepper, or lime juice. Serve hot with desired toppings like avocado, sour cream, or cilantro.
Notes
Rinse beans well to remove metallic taste. Bloom spices in oil for deeper flavor. Use fire-roasted tomatoes for smokiness. Chili tastes better the next day. Can be frozen for up to 3 months.
- Prep Time: 10 minutes
- Cook Time: 20 minutes
- Category: Main Course
- Cuisine: American
Nutrition
- Serving Size: 1 bowl
- Calories: 280
- Sugar: 6
- Sodium: 450
- Fat: 6
- Saturated Fat: 1
- Carbohydrates: 42
- Fiber: 12
- Protein: 14
Keywords: vegetarian chili, black bean chili, corn chili, one pot recipe, healthy dinner, easy chili, gluten free chili, meal prep